Layer mask photoshop overview
Layer mask photoshop is a widely used photo editing tool. It is used to hide or expose any particular part of an image during the editing process. However, the hidden or revealed portion is not permanently removed.
What is layer masking in photoshop?
The masking layer in Photoshop is a commonly used photo editing technique. It is the process of hiding a portion of an image without destructing the pixels. The pixels in the image either will be hidden or make visible through exposing them.
However, the masking images in photoshop is also associated with some complicated editing phases and processes. Due to its flexible nature, it helps a photo editor to blend the images and fine-tune them accordingly to cater to the needs.
As a direct outcome, the visibility of any specific pixels or objects either be visible or get concealed. It allows you to easily make necessary adjustments in the image.
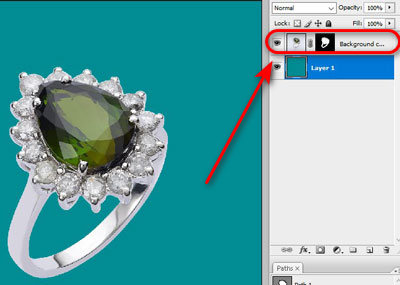
Why use layer mask in photoshop?
Image manipulation through photoshop layer mask color change is a traditional method. Check the facts why you should use layer mask in photoshop.
- Selective way to conceal/ reveal image part
- Control adjustment
- Smooth transition in image
- Grayscale mask
- Precise control in editing
- Seamless blending of image parts
- No permanent pixel altering
- Realistic composition
- Suitable for complex editing
- Easy photo manipulation
Case Study: High-Quality Hair Masking Service
What is the layer mask tool in photoshop?
The layer mask tool in a Photoshop is a tool that is used to apply layer on an image. Using the feather layer photoshop, the process becomes easier and effortless.
Using this tool, it is easier to reveal or hide any selected portion in an image.
What is the purpose of a layer mask?
The sole purpose of photoshop masks is to hide or reveal any specific part of an image. And at the same time, the quality of the pixels remains unharmed. Let’s check some of the key purposes of a layer mask.
- Selective editing
- Grayscale image
- Transparency control
- Intricate blending in image
- Easy adjustment of pixels
- Adds professional look
- Quick modification
- Assists in complex editing
- Enhances image beauty
How does a layer mask work?
The layer masking photoshop is the process to hide or reveal a layer or any specific part in the image. It is like the way to mask the corresponding part of the layer. It sets the visibility of a layer as per necessities.
However, the corresponding layer visibility is not permanent. The image editor can make necessary adjustments.
Advantage layer mask technique?
Using mask layer in photoshop is highly advantageous. The process enhances the image and its overall quality.
- Check some of the key points here.
- Helps to create layer mask photoshop
- Flexibility in image editing
- No damage to the image
- The photoshop fill layer refines edits
- Non-destructive editing
- Applicable at any editing stage
- Visibility control
- Flexible adjustments
- Mistake revision/ correction
- Efficient batch processing
Where is the layer mask icon in photoshop?
Finding the photoshop layer to mask is easier. It is located at the lower part of the Layers panel in Photoshop.
To get show layers photoshop, launch the app. Open a new document or open an existing one. Now, check if the Layers Panel is visible. If visible, select the layer. Next, check the bottom of the panel where a series of icons are available to find the layer mask icon. Find out the icon that looks square while a circle is indie the icon.
Check if your necessary layer is selected. Now, click on the layer mask icon to add layer on the layer that you have selected. It will allow you to hide or reveal portions of the image selectively.

How to add a layer mask in photoshop?
Step -: 1
Applying photoshop layer mask in an image is easier and simple process. First, you need to launch Photoshop on your device. Next, you need to open or create a document.

Step – : 2
Now, you need to check the photoshop adjustment layer is available. It means the Layers Panel should be visible in the Photoshop window. Or, you cannot apply the layer mask.
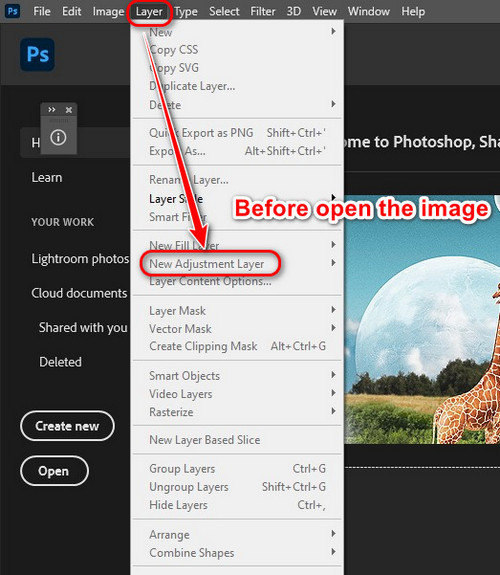

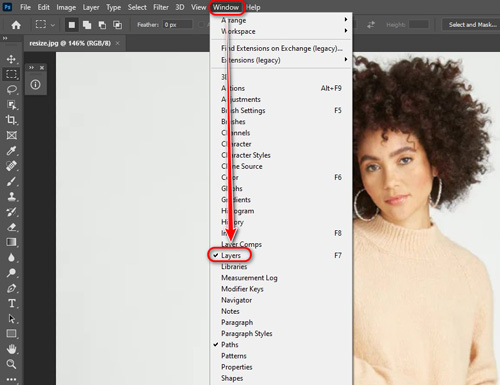
Step – : 3
So, if the photoshop create layer is absent, click on the Window. This option is located in the top of the menu. Now, select the Layers option from the menu. It will open the Layers panel.
Step -: 4
This time, you need to add layer in photoshop. Select an image and select the layer you want to mask. Now, click the Layer Mask button. A white layer mask will be added to your selected layer.

Your photoshop layer is not complete. There are certain other tasks to follow.
Step-: 5
Now, you have to click the brush to clear the unwanted areas in the image. Ensure the photoshop layer opacity is adjusted. Or in case of necessity, you need to adjust the opacity manually.
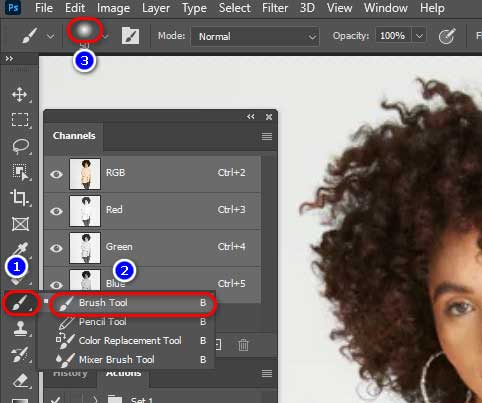
Step -: 7
Use the paint. Apply the black paint to cover the part of the layer. If you apply white color, it will reveal the portion

Remember, you can toggle between the layer to make it visible or hide it in the image.

How to remove background using layer mask with pen tool?
You might not be happy with the photoshop new layer. You may need to remove the background of your image using the layer mask. And of course with support from the pen tool.
This is not a big deal. The clipping path photoshop will help you know the process. Let’s follow this short step-by-step guide to know more.
Step 1 -:
Launch your Photoshop in your device. Now, open an image that you want to remove the background. Activate the pen tool from the photoshop adjustment panel.

Step 2-:
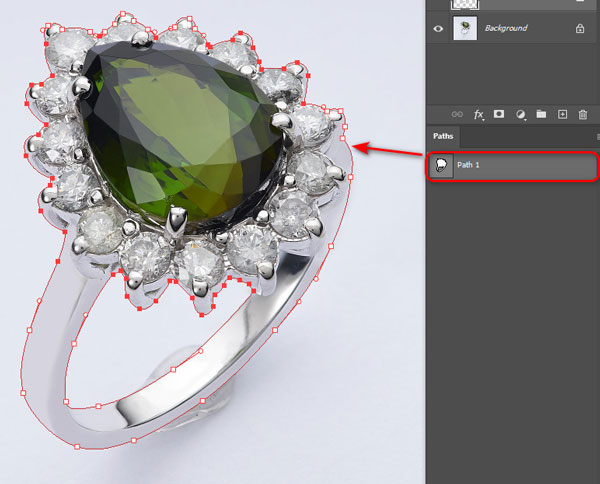
Now, zoom on the photo to start the create mask photoshop. Create the path around the subject perfectly. There should be no sharp or blur edges remaining in the anchor points.
Step 3-:
It’s time to close the path and apply photoshop select and mask. Make sure you close the paths by connecting the anchor points properly with each other.
Step 4 -:
In this stage, you can also refine the refine the edges in the image. However, this is an optional process. If the image object is fluffy or hairy, you may need to apply this refining.
Step 5 -:
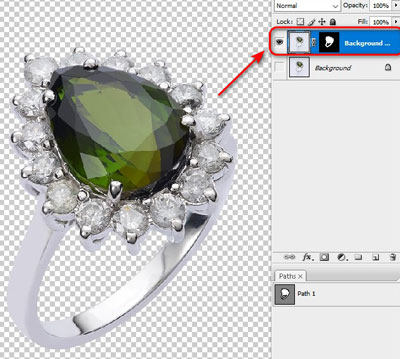
You might have the idea on how to clip a layer in photoshop. Now, you have to apply the layer mask to remove the background. Click on the Add Layer Mask icon. It is located on the bottom of the Layers panel.
Step 6 -: This mask layer photoshop will hide the background of the image. So, when you will apply the mask, the background will be removed.
Step 7-:
Though the background is removed, you may need to apply combine layer photoshop. This process will help refining the edges. Under this process, you will have to paint with white or black color for a smooth transition.

Step 8-:
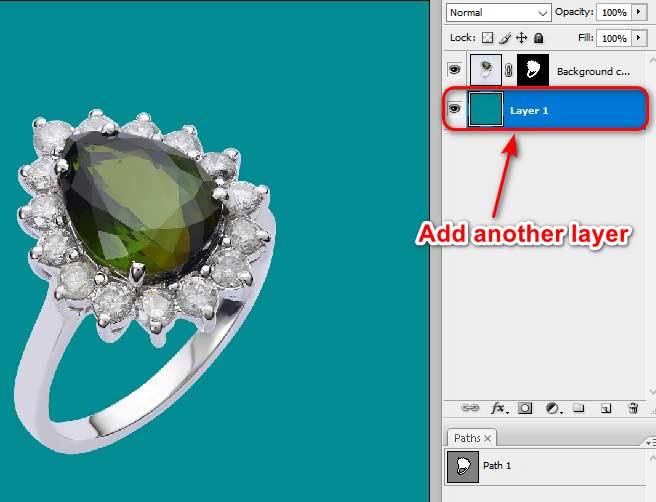
As the adjustment layer, you have to add another layer to place as the new background. This layer will play the role of a fresh background for the image.
Final Result:

Frequently Asked Questions
How to resize a layer mask in photoshop?
To resize a layer mask in Photoshop, you need to select the layer mask first. Click on the Layers panel and select the Free Transform tool. Alternatively, you can press Ctrl and T together.
Now, hover the mouse cursor by holding the Shift key and move it across directions you need. The layer will be resized. And for confirmation, press on the Enter button.

How to remove layer mask in photoshop?
Removing a layer mask in Photoshop is pretty simple. First, you need to select the layer mask from the Layers panel. Make sure the mask is highlighted. Most of the time people highlight the layer instead of the mask. So, check it again.
Now, press on Alt button and right click on the layer mask thumbnail. It is located in the Layers panel. You will get a context menu. Select the Delete Layer Mask.
It will be remove and the entire image or image content will be visible.

How to make a black layer mask in photoshop?
For making a black layer mask in Photoshop, you have to add a layer mask. First, select your preferred layer for adding the mask.
Next, fill the mask with black color. You can press Ctrl and I together to fill the mask with black color.

How to enable layer mask in photoshop?
Enabling layer mask in Photoshop is not a big deal. First, you have to launch the app on your computer. Next, create or open a document in Photoshop. From there, check if the Layers panel is visible and active.

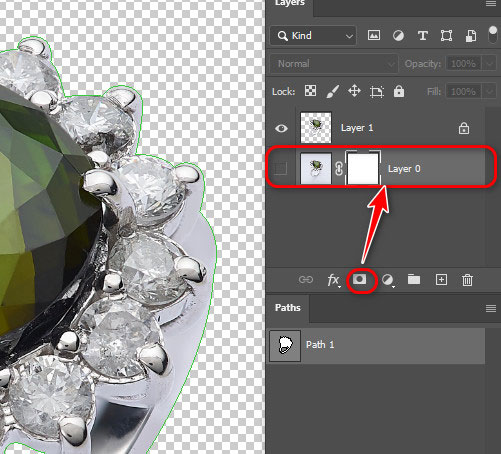
Lastly, you have to check the Layers panel. Check if the thumbnail in the layer mask is visible. If it is visible, it means the layer mask is enabled in prior. However, if you find it disabled, click on it to enable the layer mask.
How to duplicate layer mask in photoshop?
First, launch Photoshop on your computer or laptop and create a document. Alternatively, you can open a document, as well.
Go to the Layers panel. Prior to that check if the panel is visible.
Then select the layer that you want to duplicate. Press the Alt and drag the layer mask thumbnail. When the layer is dragged to another layer, you have to release the mouse.
The layer mask will be duplicated.

How to edit a layer mask in photoshop?
You can adjust layer photoshop for a clear visibility of the object inside the image. So, you need to modify the grayscale values in a selective manner.
First, select the Layer mask and make it active from the Layers panel. Then, select the editing tool like the Brush Tool. Now, you have to adjust the flow and opacity to control the mask. Also, you can paint on the mask that will modify the transparency.
You need to adjust the edits as long as it takes to get prefect blend.
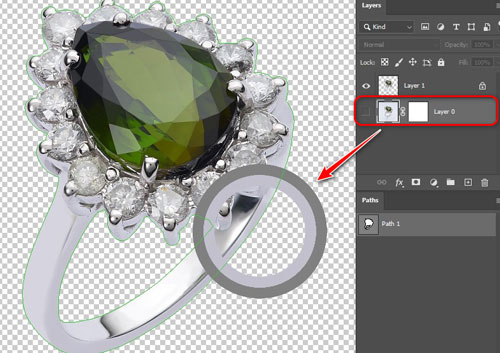
How to add multiple layer masks in photoshop?
To add multiple layer masks in Photoshop, select the layer first. Then, add layer mask to add multiple layer mask in the image.
Press and hold the Alt button and click on the layer mask that is existing. The clicking will duplicate the mask. In other words, it will create another layer mask.
Now, you can edit or modify the masks as per your needs.

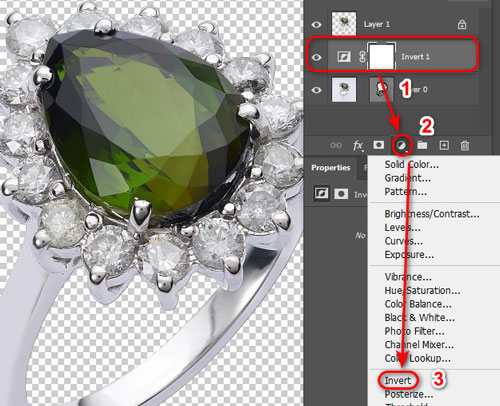
How do you invert a layer mask in photoshop?
To invert image in photoshop, you need to select the Layer mask first. This is a smart and quicker process.
After selecting the layer mask, click on its thumbnail to activate it. Next, press the Control and I button together. The image will be inverted.
Alternatively, you can also right click on the mask. From the available options, select Invert.
And lastly, you have to refine the image.
How to change color in photoshop?
Changing the layer mask color in Photoshop is a bit tricky. Because the Layer masks are in grayscale. So, when you want to change the color, you need to create a solid color layer to be used under the target layer.
Next, you have to Create Clipping Mask. This process will restrict the color of the masked area in the image.
Further Reading: How to make a clipping mask in photoshop
How to change opacity of layer masks photoshop?
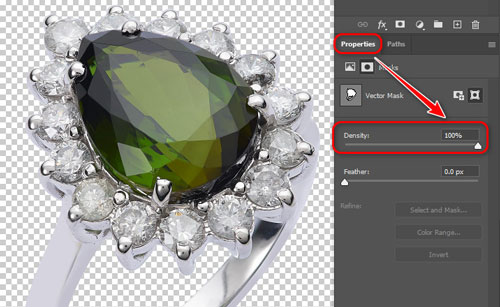
To adjust or change the opacity of layer mask in Photoshop requires the modification of the values in the grayscale. So, if you want to change it, open the Properties panel. Now, find the Density slider.
You can adjust the opacity through moving the slider from left to right.
How to make a shape in photoshop?
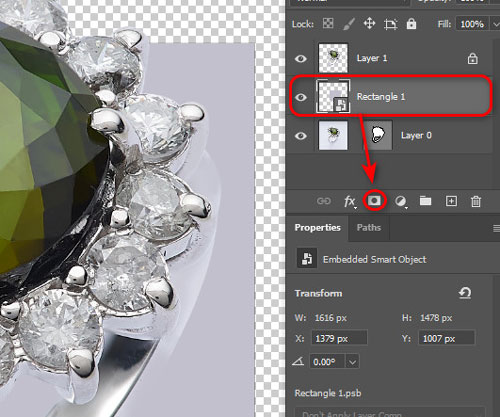
In order to make a shape layer mask in Photoshop, you need a shape layer and a mask. The mask will set the transparency level.
As the first step, you have to draw a shape using the shape tool. Now, right click on the shape. Select Convert to Smart Object. It will make the shape flexible.
Next, click on the Add Layer Mask option. You will find it in the bottom of the window. Modify the mask to reveal or hide the object proportion.
How to erase layer mask in photoshop?
To erase layer mask in Photoshop, you need to select the layer mask. Instead of fill layer photoshop, click and select the layer mask from the Layers panel.
Now, take the Eraser tool from your Photoshop toolbar. You have to adjust the brush size per your requirement. Erase the areas of your Photoshop canvas to remove the mask in places required.
Alternatively, you can right click on the Layer mask and select the Delete Layer Mask option. It will also bring same result.

Recommended Reading: Photoshop layer mask tips and tricks


Recent Comments