How to do hair transparent background in photoshop
Hair transparent background in the model image is the most important task for eCommerce and online business owners.It is that time of the year when you start using the latest version of adobe photoshop cc 2022, and there are small changes that you need to deal with while editing images. The tricky photo editing processes such as hair transparent background becomes more accessible than before with the new updates. So if you didn’t know how to do transparent hair background in photoshop, then this article is for you.
Ecommerce retailers, professional photographers, or marketing professionals anyone involved with image marketing need to know about erasing hair background. Because getting images with a transparent background is an unavoidable situation if they are for marketing purposes. And Removing the background from the hair is one of the most challenging things to do in photoshop.
Hair is the most challenging area to work with and edit in photoshop. You need to know the use of background eraser tools in photoshop very well. Not knowing this will be frustrating and will consume a lot of your time.
Case Study: High-Quality Hair Masking Service
What is transparent background in photoshop?
A transparent background image in photoshop is typically a blank background with the main subject of the image, such as a product, models, or logos in the foreground. Most of the eCommerce platform demands a transparent background for product photos. With a transparent background, images look original and fresh. So it can also be a branding tool. Many tools, such as Adobe Photoshop, can be used to create transparent backgrounds.
So now let’s get started with today’s photoshop tutorial on making transparent background hair.


Step :1 Open model photography to make transparent hair background in photoshop
In this first step, we will open model photography and gradually make hair transparent background in photoshop in the later steps. You can take any model photography with close shots for this tutorial. If you want to learn this process effectively, then I would suggest you choose model photography of females focused primarily on hair images.
So how to open model photography in photoshop? The easiest way to insert your model photos to erase picture background in photoshop is to open the software and drag & drop your image on the dashboard.
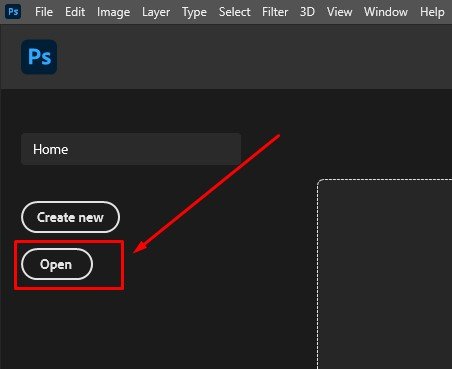
Step :2 Create a duplicate layer for transparent hair background
Now that we have opened the image, we want to edit and create the white background from the hair area, and we need to create a duplicate layer first. If you do not see any Layer menu, then go and select Windows→ Layer from the top menu bar.
Creating duplicate layers is essential in photoshop. The duplicate layer ensures that the original file remains unharmed if anything goes wrong while editing. You can create a duplicate layer by right-clicking on the background layer, which is locked, or you can use a duplicate layer shortcut as well. Pressing Command + J (Mac) or Control + J (PC) is the easiest shortcut to create a duplicate layer.

Step :3 Create a high contrast layer background for transparent hair background.
In this step, we will create another layer that will be in high contrast to the image’s background color. So we will create another layer which you can do just by clicking on the plus (+) sign right at the bottom of the layer panel. Creating a high contrast layer background will help us with the transparent hair process in photoshop.

When we work on the hair part, this high contrast background layer will help us to identify how much background bg we have removed while doing the hair masking. So from the left Toolbar menu, double click on the foreground color.
A window will pop with colors and sliders from where we will use the sliders and select a high contrast color based on the original background color we have on our image.
Tip: Use bright and high contrast colors.
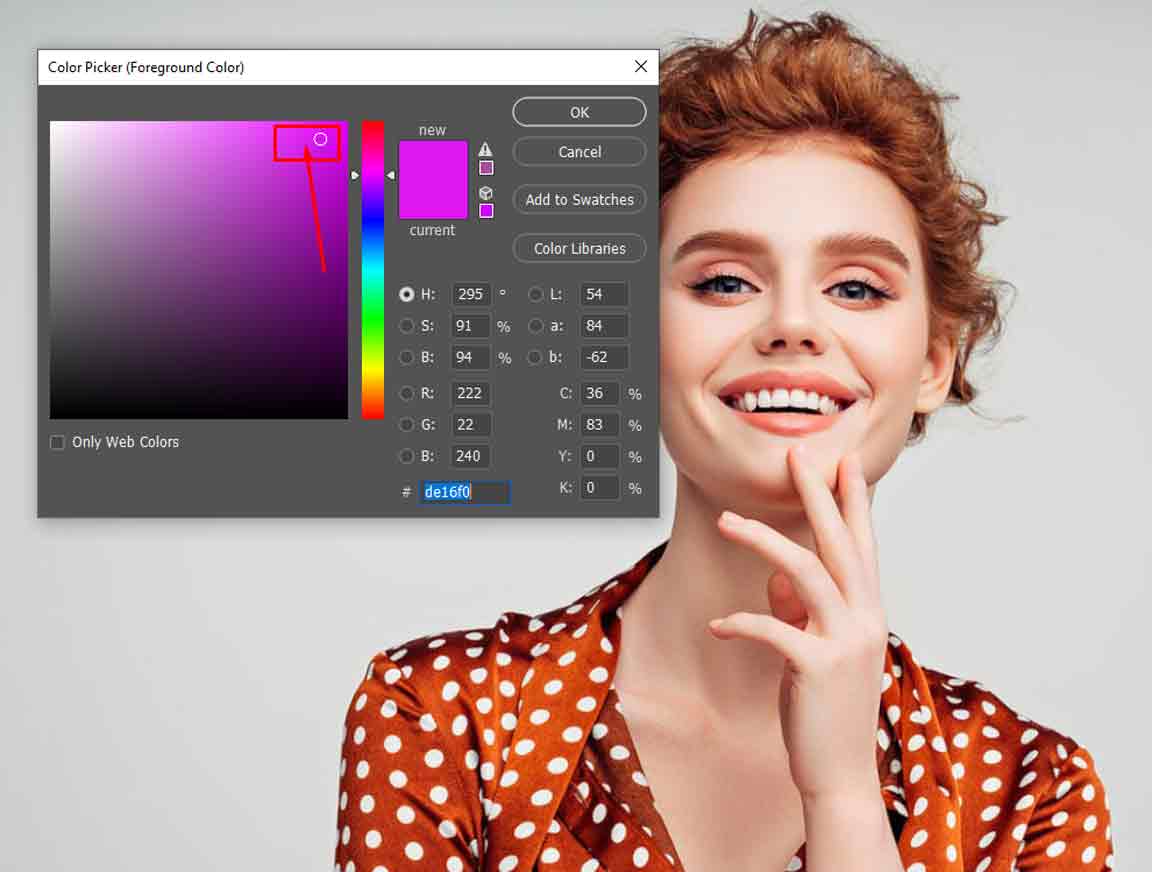
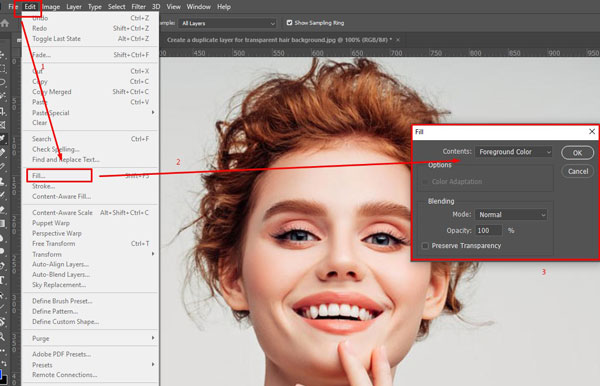
As we get our high contrast color, we will select the newly created layer and go to the top Menu bar. From there, we will click on the Edit menu and then select the Fill option from the dropdown menu. Or you can use the photoshop fill foreground color shortcut and press SHIFT+F5 (FN+SHIFT+F5 on a Mac) to make a dialog box. And from there, select the foreground color and make it 100%..
At this point, we will have three layers: the original one, the second one is the copy of the first one, and the last one is filled with color. So now we will drag the 3rd layer, which is filled with color, and place it between the 1st and 2nd layers.
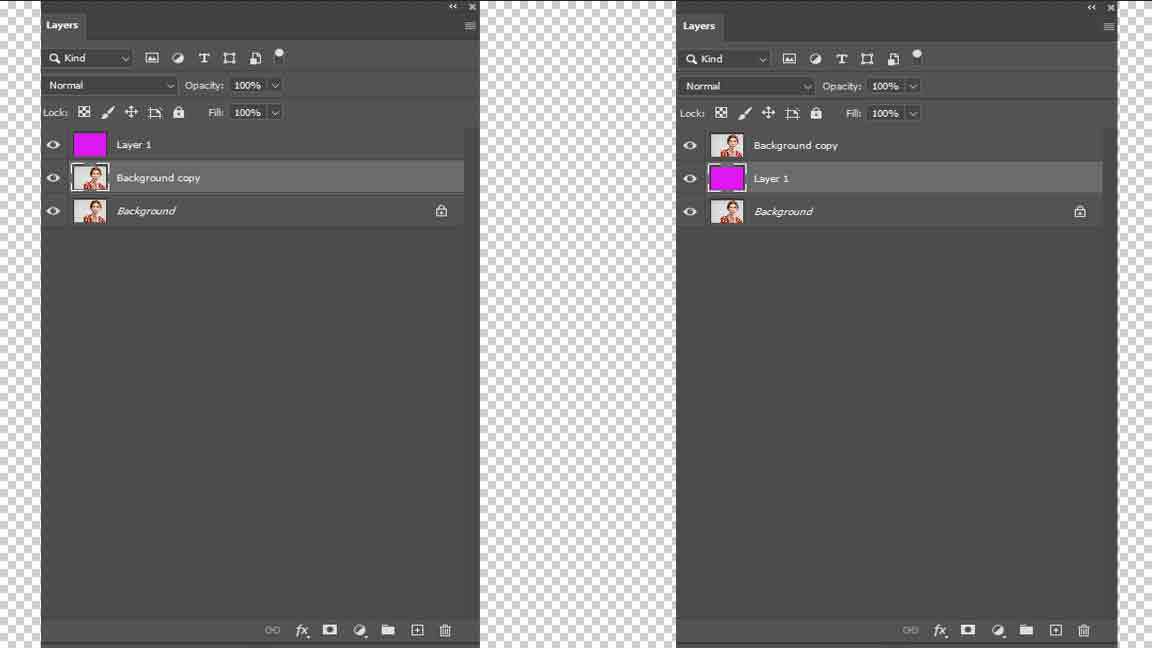
Step :4 Select background erase tools for hair transparent background
This step will select the photoshop eraser tool for hair transparent background. We will find the Background Eraser Tool in the left Toolbar under the Eraser Tool. Selecting the erase tool is not enough to remove the background in photoshop. We have to adjust some settings for the tool to make it effective.
After we select the eraser tool in photoshop, we will see three little buttons in the options bar just under the menu bar of the photoshop software. These three buttons represent three settings (Contiguous, Once, or using a Background Swatch) that help us do hair masking with a solid background. We will select the third option, which is Background Swatch, for our hair background remover process. We are done with this step, so that we will work on more adjustments in the next step.

Step :5 Select Discontiguous and Protect Foreground option
So we will go back to our adjustments, and the adjustment we are going to do in this step needs some discussion first. After the three options in the options bar in photoshop, we will see Limits. Set this option to Discontiguous and set the Tolerance level at 50%.

Another important option that we need to keep in our mind to adjust is the Protect Foreground Color option. We must have to Tick the box of this option, and it will help us separate the top layer from the layer underneath it while we remove hair from the background in Photoshop.
There is another small setting that actually depends on your preferences, and that is adjusting the brush size. I already have mentioned the Tolerance level to keep it at 50%. Select the brush size according to your requirements and start with a 50% tolerance rate. After starting to remove background from image photoshop, you can increase or decrease these settings gradually if needed.
Outsource E-commerce Product Photo Editing

Step :6 You Erase hair background with your background erase tool
With the above step selecting the erase background tool and adjusting it is over. Now we will start the actual editing to erase the background from the image. Select Layer 2, which is the duplicate layer of the original layer.
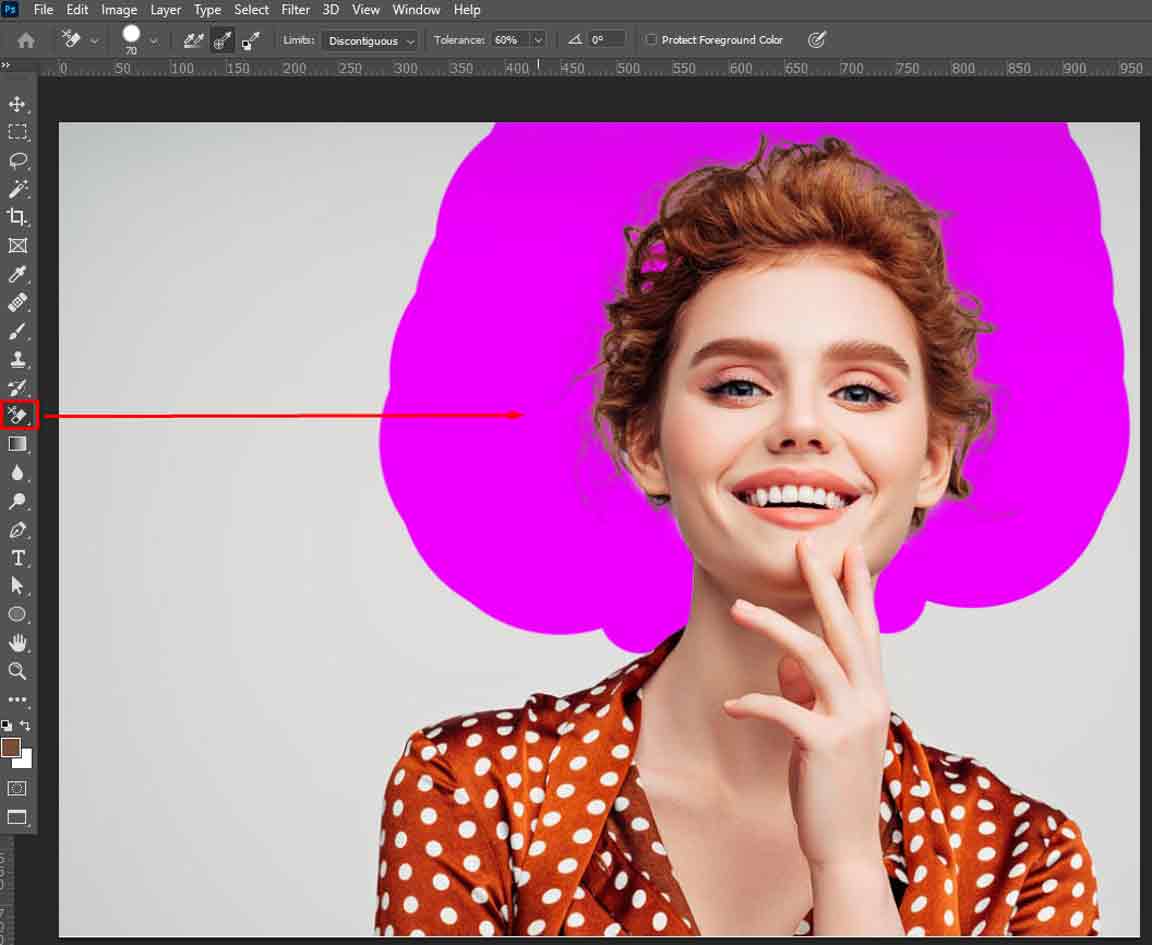
While selecting the background eraser tool, begin to swipe over the hair part to remove the backdrop. While swiping over the areas, you might require two things to change: the brush size and the tolerance. For some areas, you might need a small brush size and a higher tolerance percentage or vice versa.

Swipe repeatedly to cover the entire hair area to erase and make a transparent background from behind the hair. Try to zoom in and out so that you don’t miss even a tiny bit of it. After you are done with the hair part now, you can increase the brush size and erase the rest of the picture background.

Step : 7 Replace the background for hair transparent background
When you are done swiping all over the image, turn off the other two layers from the layer panel. You will get a transparent backdrop using the latest photoshop cc for your model photo.
Photoshop replacing the background for photos becomes easy when you have a transparent background. So now, in this step, as you have your background removed, you can replace the background of your image like falling off a log.

To replace the background in photoshop for this image, the first thing you need to do is insert an image that will have the background you want. You can insert that image directly into the layer and place it underneath your current layer to add a background in photoshop.
Or you can take your image with a transparent backdrop and place it on that image in photoshop. The major secret of photoshop replacing the background is to have a good quality photo with a transparent backdrop. After going through this photoshop tutorial, I hope you have learned how to cut out an image in photoshop with hair in it.

Step : 8 Now you can save it as a transparent background
You can save your file after adding a background in photoshop from the above step, but if you don’t want to add any background, you can stop your editing when you have removed the background. Go to the File-one menu bar, click on it, and select the Save option from the dropdown menu. Please give it a name and click OK to save the file.
If you want to improve your image editing skill in photoshop, this tutorial will be an essential lesson. Doing hair transparent background in photoshop 2022 might take you on top of some professional photoshop experts. Learning how to do hair transparent background in photoshop opens up some new editing opportunities for you.





Recent Comments