You nailed the shot. Then the client asked for a wide banner, and your photo is vertical.
Or your backdrop ended right at the model’s elbow. Either way, you need more background than the camera caught.
Good news: Photoshop can build it for you. The Crop Tool and Generative Expand handle most photos in about a minute. And if AI isn’t allowed, four classic methods still deliver a clean result.
Below, you’ll learn how to extend the background in Photoshop five ways. You’ll also learn the small finishing step that separates “obviously edited” from “nobody can tell.”
Quick Answer: How to Extend a Background in Photoshop
In a hurry? Here’s how to extend a background in Photoshop with Generative Expand:
- Press C to open the Crop Tool.
- In the options bar, set Fill to Generative Expand.
- Drag the crop edges outward, then press Enter.
- Leave the prompt box blank, or type what you want added.
- Click Generate in the Contextual Task Bar.
- Pick your favorite of three variations in the Properties panel.
That’s it. These steps also show how to expand an image in Photoshop for any aspect ratio.
Can’t use AI for this job? Jump to Method 2. Canvas Size plus Content-Aware Fill gets you there offline.
Which Method Should You Use?
Here’s the secret most tutorials skip. Your background, not your skill level, picks the method.
A plain studio wall forgives almost anything. A busy city street punishes every shortcut. Match your photo to a row below, and you’ll save yourself a lot of undo clicks.
| Method | Best for | Needs internet or credits | Keeps original pixels | Speed | Main risk |
|---|---|---|---|---|---|
| Generative Expand (AI) | Complex scenes, big expansions, new aspect ratios | Yes | Yes, on a new layer | Fast | Odd details, soft areas |
| Content-Aware Fill | Sky, grass, sand, plain walls | No | Yes, with Output to New Layer | Fast | Repeated patterns |
| Content-Aware Scale | Small stretches of simple backgrounds | No | No, it stretches pixels | Fast | Smeared or warped areas |
| Backdrop stretch or gradient blend | Studio paper, solid and white backgrounds | No | Yes, on new layers | Medium | Visible seams |
| Clone Stamp Tool | Brick, fabric, foliage, patterns | No | Yes, on a new layer | Slow | Obvious repeats |
Still torn? Use these quick picks:
- Complex scene or a big change in shape? Go with Method 1.
- Sky, grass, sand or a plain wall? Try Method 2 or Method 3.
- Studio paper or a white product background? Method 4 looks cleanest.
- Brick, fabric or a repeating pattern? Use Method 5, or Method 1 with a prompt.
Before You Start: Prepare Your Photo
Most messy extensions trace back to one of three skipped steps. Spend sixty seconds here, and you’ll avoid an hour of repairs.
Duplicate the Layer and Unlock It
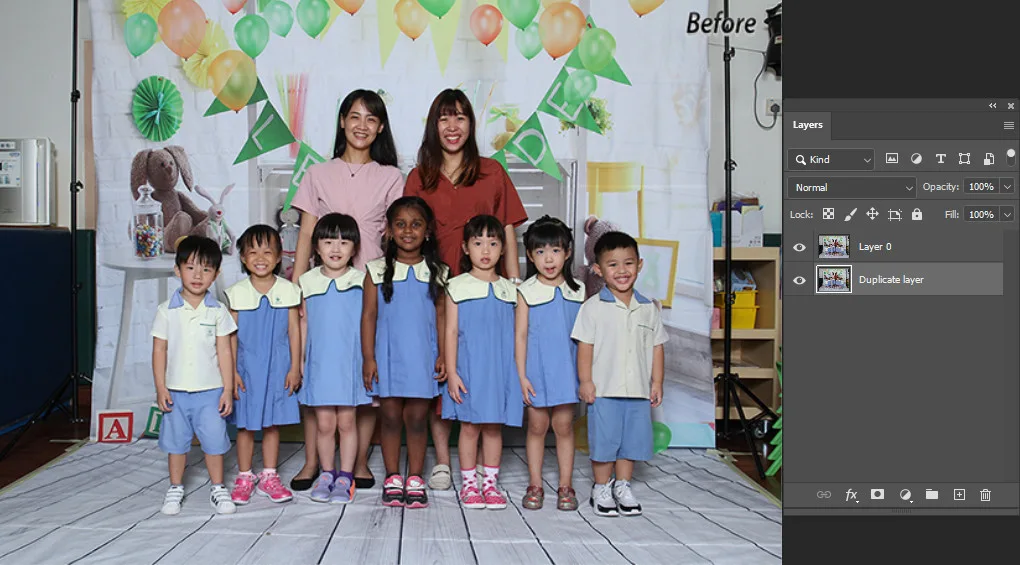
Photoshop locks your Background layer by default. Click the small lock icon in the Layers panel to free it. Then press Ctrl+J (Cmd+J on Mac) to duplicate the layer.
Now your original stays safe, no matter what happens next. This step also matters for Method 3. Content-Aware Scale simply refuses to run on a locked layer.
Pick Your Final Size or Aspect Ratio
Know where the photo will live before you add a single pixel. The destination decides how much space you need.
| Where it’s going | Aspect ratio |
|---|---|
| YouTube thumbnail | 16:9 |
| Instagram story or Reels cover | 9:16 |
| Instagram feed post | 4:5 |
| Marketplace product photo | 1:1 (check your marketplace’s rules) |
| 4×6 print | 3:2 |
Pick a matching preset in the Crop Tool options bar. Want to drag freely instead? Click Clear. Printing the final image? Check common print sizes like 4×6 first.
One rule saves a lot of grief. Never add more than about half the width in one pass. Expand in two or three smaller steps, and the results stay sharper.
Edit the RAW File First
Shoot in RAW? Finish your exposure, white balance and color in Camera Raw or Lightroom first. Then open the file in Photoshop.
Many retouchers make the extension one of their last steps. That way, the new pixels match your final colors, not your rough draft. A JPEG works for quick jobs. Heavy JPEG edits after extending, though, often expose the seam.
Method 1: Extend the Background with Generative Expand (AI)
Photoshop Generative Expand feels a bit like magic the first time. You drag the canvas wider, click once, and a believable scene appears.
Adobe Firefly powers it from inside the Crop Tool. Older tools copy pixels you already have. Generative Expand creates brand-new ones, matched to your scene’s light, color and perspective.
That’s why it shines on busy streets, interiors and buildings. Those scenes break every other method.
How to Use Generative Expand Step by Step
- Open your photo with File > Open, and select the image layer.
- Press C to grab the Crop Tool.
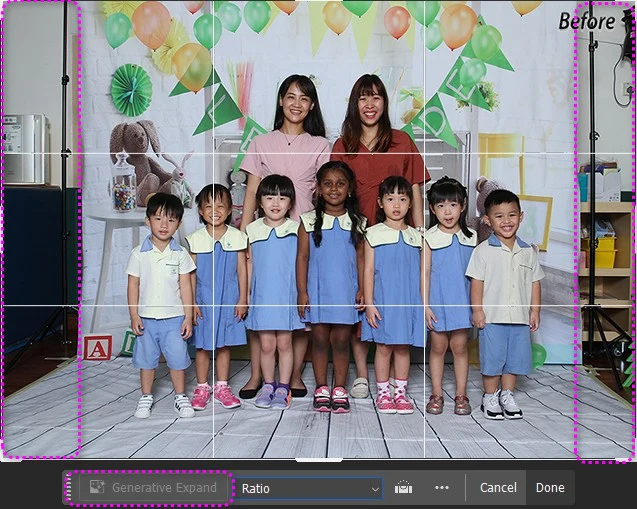
- In the options bar, set Fill to Generative Expand.
- Drag a side or corner handle outward. Hold Alt (Option on Mac) to grow both sides evenly.
- Press Enter or click the check mark. Then click Generate in the Contextual Task Bar.
- Browse the three variations in the Properties panel. Click Generate again for three fresh ones.
Photoshop places the result on a new Generative Layer. Your original pixels sit untouched underneath, so you can always go back.
Now, about step 3. That one setting decides whether you get AI or nothing at all. If Fill says Transparent or Content-Aware Fill, Generative Expand never runs. Forgot it? Don’t worry. A Generative Expand button also pops up in the task bar after you drag.
Should You Type a Prompt?
Most of the time, leave it blank. Photoshop studies the photo and simply continues the scene. Skies, rooms and studio walls come out great this way.
Type a prompt only when you want something specific in the new space. Keep it short. Describe the background you want, never the whole photo.
| Prompt | What happens |
|---|---|
| “more blue sky” | Good: describes only the new area |
| “continue the wooden floor” | Good: tells Photoshop exactly what to extend |
| “empty gray studio wall” | Good: keeps the background clean |
| “a woman at the beach at sunset” | Weak: describes the whole photo and may add a second person |
| “make it cinematic” | Weak: asks for a style, not for content |
Combine the Best Parts of Two Variations
This trick turns “almost right” into “perfect.” You’ll rarely see it in written tutorials.
Here’s the situation. You expand both sides of a photo. The left side looks flawless, but the right side has a leaning building. Instead of settling, mix two variations:
- Select the Generative Layer and press Ctrl+J (Cmd+J) to duplicate it.
- On the copy, choose a different variation that fixes the bad side.
- Rename the layers “Left” and “Right” so you don’t mix them up.
- Click the top layer’s mask. Draw a Rectangular Marquee over the half you don’t want.
- Fill that selection with black, then press Ctrl+D to deselect.
Let your selection overlap the original photo’s edge a little. The blend hides better there. New to masks? This guide explains how a layer mask works.
Credits, Commercial Use, and Content Credentials
Before you use Generative Expand on client work, know three facts.
- It costs credits. Each generation uses one generative credit from your Adobe plan.
- It needs the internet. The AI runs on Adobe’s servers, not your computer.
- It’s cleared for commercial use. The only exception is content made in the Photoshop beta app.
Adobe confirms all three in its generative AI FAQ.
One more detail matters for clients. Photoshop adds Content Credentials when you export, and those can show Firefly AI was used. Some stock sites and photo contests ban AI edits. If yours does, Methods 2 to 5 keep you safe.
Method 2: Extend the Background with Content-Aware Fill (No AI)
No credits left? Client says no AI? Content-Aware Fill has quietly handled this job for years.
It borrows pixels from your photo and blends them into the gap. It runs offline and costs nothing extra. The trade-off is simple: it can’t invent anything that isn’t already there.
So it loves skies, grass, sand and plain walls. You have two ways to use it.
Option A: Crop Tool with Content-Aware Fill
- Press C for the Crop Tool.
- In the options bar, set Fill to Content-Aware Fill. Older versions show a Content-Aware checkbox instead.

3.Drag the edges outward.
4. Press Enter and let Photoshop fill the gap.
Then zoom in and hunt for repeats. A few quick strokes with the Clone Stamp Tool usually hide them.

Option B: Canvas Size and the Content-Aware Fill Workspace
Want more control? This route adds a minute but lets you choose exactly what Photoshop copies.
- Go to Image > Canvas Size (Alt+Ctrl+C, or Option+Cmd+C on Mac).
- Tick Relative, enter the space to add, and click an anchor square. The anchor decides which side grows.
- Select the new transparent area with the Magic Wand Tool (W).
- Go to Select > Modify > Expand and enter 10 to 20 pixels. This small overlap prevents a hard seam.
- Choose Edit > Content-Aware Fill. A green overlay shows where Photoshop will sample from.
- Grab the Sampling Brush and paint your subject out of the green area.
- Set Output To: New Layer, then click OK.
Don’t skip step 6. Without it, Photoshop happily copies strands of hair or bits of a face into the background.
Short on time? Select the empty area and press Shift+F5. Then pick Content-Aware from the Contents menu.
Clean Up Seams and Repeated Patterns
Content-Aware Fill has one bad habit. It repeats itself. Look for the same cloud, rock or shadow showing up twice, then fix it:
- Patch Tool (J): Circle the repeat and drag it onto a clean area.
- Spot Healing Brush (J): Paint over thin seams and small marks.
- Clone Stamp Tool (S): Rebuild larger areas by hand on a new layer.
Switch your source area often, or you’ll create new repeats while fixing old ones. Seeing whole objects twice? Here’s how to remove repeated objects cleanly.
Method 3: Stretch the Background with Content-Aware Scale
Content-Aware Scale is clever. It stretches the boring parts of your photo, like sky or plain walls. Meanwhile, it tries to leave people and objects alone.
Think of it as stretching an image without squashing your subject. It shines on small changes and struggles with big ones.
How to Use Content-Aware Scale
- Unlock the image layer, as shown earlier.
- Add canvas with the Crop Tool or Canvas Size. Leave the new space transparent.
- Choose Edit > Content-Aware Scale (Alt+Shift+Ctrl+C, or Option+Shift+Cmd+C).
- Drag a side handle into the empty space. Hold Alt (Option) to stretch both sides from the center.
- Press Enter when the background fills the canvas.
Stretch a little at a time. The moment clouds, grass or edges look smeared, back off.
Protect the Subject from Stretching
Sometimes Content-Aware Scale bends a hand or widens a face. You can stop that by telling Photoshop what to protect:
- Select your subject with the Lasso Tool or Select > Subject.
- Go to Select > Save Selection, name it “Subject,” and click OK.
- Press Ctrl+D (Cmd+D) to deselect.
- Run Content-Aware Scale again.
- In the options bar, choose “Subject” from the Protect menu.
Photographing people? Also click the Protect Skin Tones button, the little person icon in the same bar. Adobe’s Content-Aware Scale guide covers every option.
A rough selection weakens the protection. Learn how to select your subject cleanly first. Still seeing warps? Your stretch is too big for this tool. Switch to Generative Expand.
Method 4: Extend a Studio Backdrop or Plain Background
Every studio photographer knows this moment. The shot looks perfect, until you spot the light stand past the paper’s edge.
Plain backdrops are the easiest backgrounds to fix. Manual methods often beat AI here, too. AI can sneak in wrinkles and texture your backdrop never had.
Stretch a Strip of the Backdrop
Here’s how to extend the backdrop in Photoshop when your seamless paper runs out too soon.
- Add canvas on the side you need with Image > Canvas Size.
- Use the Rectangular Marquee Tool (M) to select a thin strip of clean backdrop. Stay clear of your subject.
- Press Ctrl+J (Cmd+J) to copy the strip to a new layer.
- Press Ctrl+T (Cmd+T) and drag the side handle across the gap.
- Press Enter.
Want smoother tones? Flip the strip first with Edit > Transform > Flip Horizontal. One warning, though. This trick works only on solid or softly shaded backdrops. Patterns turn into streaks.
Blend a Gradient Backdrop with a Layer Mask
Many backdrops fade from bright in the center to darker edges. Stretch one carelessly, and a hard line appears. Blend it instead:
- Put the extended color or texture on a layer below your photo.
- Click Add Layer Mask on the photo layer.
- Pick the Gradient Tool (G) set to black and white.
- Drag a short gradient across the photo’s edge.
Now the two layers melt together with no straight cut. Why bother? Seams that hide on a screen often jump out in print. These layer mask tips help you blend even cleaner.
Extend a White Product Background
Marketplaces love square product photos. Your camera, unfortunately, doesn’t shoot square. Here’s how to extend white background in Photoshop in five steps:
- Pick the Eyedropper (I) and click the background to sample it.
- Go to Image > Canvas Size.
- Set Canvas extension color to Foreground. Choose White if the background is pure white.
- Click OK.
- Paint out any faint line with the Spot Healing Brush.
Did the product sit on a surface? Then the new area needs a matching shadow. Without one, your item looks like it’s floating. Here’s how to add a natural cast shadow.
Shoot a Backdrop Plate Next Time
The best fix happens before you edit. Experienced studio shooters rely on a simple habit.
Before your subject steps in, take one frame of the empty backdrop. Keep the same camera settings. Later, layer that plate under your shots and mask it in. You get real pixels, not invented ones.
Shooting outdoors? Grab a few extra overlapping frames and merge them with Photomerge. Our guides to studio photoshoot ideas and panorama photography show how to plan both.
Method 5: Rebuild a Textured or Patterned Background with the Clone Stamp Tool
Brick walls, fabric and leaves have rules. Every row, thread and shadow has to line up.
Content-Aware tools smear those details, and AI sometimes invents new shapes. So here’s how to extend a textured background in Photoshop with full control:
- Add a new empty layer above your photo.
- Press S for the Clone Stamp Tool.
- In the options bar, set Sample to Current & Below.
- Alt-click (Option-click) a clean area to set your source.
- Paint into the empty space with short strokes.
- Reset your source often so patterns don’t repeat.
Working with a repeating pattern, like rows of bows on a wall? Copy a block of it to a new layer. Duplicate and line up the copies, then mask the joins.
Fair warning: this is the slowest method on the list. Save it for areas where every detail counts.
How to Extend Only Part of a Background
Sometimes the canvas is fine. You just need one area to keep going, like a wall behind a sign.
That’s a job for Generative Fill, not Generative Expand. Here’s the difference in plain words. Generative Expand adds space outside the frame. Generative Fill changes what’s inside it.
- Draw around the area with the Lasso Tool (L). Include some of the background you want to continue.
- Click Generative Fill in the Contextual Task Bar.
- Leave the prompt blank, or describe the background, like “continue brick wall.”
- Click Generate and pick the best variation.
Prefer no AI? Make the same selection and choose Edit > Content-Aware Fill. These same select-and-fill steps also help you remove objects in Photoshop.
How to Make an Extended Background Look Real
Here’s what separates beginners from pros. Most fake-looking extensions have the right content. They fail on texture, focus or lines.
Viewers can’t always explain why an edit feels off. They just feel it. These four checks fix that feeling.
Match the Grain
New pixels usually look smoother than your original photo. Up close, that glossy patch gives the whole edit away.
Select the new layer and choose Filter > Noise > Add Noise. Set it to Gaussian and Monochromatic. Start small, then raise the amount until both sides match at 100% zoom.
Match the Blur and Depth of Field
Is your original background soft and dreamy? Then the new area needs the same blur. Add a gentle Gaussian Blur to the new layer. Then mask it so the blur fades into the original.
Check Lines, Perspective, and Light
Trace every line across the seam with your eyes. Horizons, floors, tables and buildings should continue straight.
AI sometimes tilts a building or squashes it. When that happens, regenerate or combine variations. Finally, check your shadows. They should fall the same way on both sides.
Inspect at 100% Before You Export or Print
Zoom to 100% and scan the whole seam slowly. Printing exaggerates stretched pixels and hard edges, so problems grow on paper.
Blend with soft masks, then check your resolution. For sharp prints, make sure your file reaches 300 DPI at the final size.
Troubleshooting: Why Your Extended Background Looks Wrong
Something looks off, and you can’t pin it down? You’re not alone. These six problems cause most failed extensions, and each has a quick fix.
Generative Expand Is Missing or Grayed Out
Start with the sneaky one. Generative Expand only works on RGB, 8-bit files. A 16-bit RAW export quietly turns the button gray. Fix it under Image > Mode > 8 Bits/Channel.
Still stuck? Check these next:
- You’re using the Crop Tool, and Fill is set to Generative Expand.
- The Contextual Task Bar is on. Find it under Window > Contextual Task Bar.
- You’re online and signed in to your Adobe account.
- You have generative credits left, and Photoshop is up to date.
Adobe lists every requirement in its generative AI troubleshooting guide.
The New Area Looks Blurry or Soft
Blurry fills usually come from adding too much space at once. Small original files make it worse.
- Expand in two or three smaller steps.
- Click Generate again for fresh variations.
- Hover over a variation in the Properties panel and click Enhance Detail, if you see it. It works on variations larger than 1,024 pixels.
- Finish by matching the grain.
Content-Aware Fill Copies the Subject
Your subject sits inside the sampling area. Open Edit > Content-Aware Fill again. Paint the subject out of the green overlay with the Sampling Brush, then apply.
The Subject Gets Stretched or Distorted
Content-Aware Scale ran without protection, or you pushed it too far. Save the subject as a selection and choose it under Protect. Or stretch less and let Generative Expand handle the rest.
Just a small bend? The Forward Warp tool in Liquify can gently nudge it back.
The Clone Stamp Won’t Paint on the Empty Area
This one frustrates a lot of people. Usually, you haven’t set a source point yet. Or the wrong layer is selected. Or you’re sampling an empty layer.
Alt-click (Option-click) a source first. Then set Sample to Current & Below or All Layers.
There’s a Visible Line Where Old Meets New
The fill didn’t overlap real pixels, or a mask edge is too hard. Expand your selection by 10 to 20 pixels before filling. Then paint the seam with the Spot Healing Brush. A soft gradient mask also works.
Seeing black or checkered edges after cropping? Your Fill setting was on a basic option. Undo, switch Fill to Generative Expand or Content-Aware Fill, and crop again.
Extending Backgrounds in Other Versions and Apps
This guide uses current Photoshop desktop menus. Mac users just swap Ctrl for Cmd and Alt for Option. Working somewhere else? Here’s what changes.
Photoshop on the Web and iPad
Photoshop on the web has Generative Expand too. Choose Size & position > Crop, drag the corners out, and select Generative expand. Adobe’s quick tip walks through desktop and web side by side.
On iPad, Generative Expand arrived in version 5.4 in December 2023. Tap the Crop tool, drag the borders, then tap Generative Expand. Adobe’s iPad guide has the details.
Older Versions Like CS6
Still running CS6? You won’t find Generative Expand, but you’re far from stuck. Content-Aware Scale arrived in CS4, and Content-Aware Fill followed in CS5.
Use Edit > Fill > Content-Aware for gaps and Edit > Content-Aware Scale for stretches. Every manual method in this guide works in any version.
Free Option: Adobe Firefly
Don’t have Photoshop? Adobe Firefly runs Generative Expand right in your browser. Free accounts get free daily generations.
- Open the Firefly image editor and upload a JPG, PNG or WEBP file.
- Choose Generative Expand from Quick Actions.
- Pick an aspect ratio or drag the borders.
- Click Generate.
Files can be up to 100 MB and must be at least 512 × 512 pixels. Adobe lists the details on its Firefly image expander page.
When to Hand It Off to a Professional Editor
Extending one photo takes a minute. Extending 400 product shots to the same ratio can eat your whole week.
The same goes for a portrait session where every frame hits the backdrop edge. Or a print campaign where one visible seam ruins the run. When consistency, volume or print quality matter most, a second pair of hands pays off.
Our team handles product photo editing, photo retouching and car photo editing for stores and photographers. Can’t extend a background believably? We can replace the background instead.
Sitting on a big batch? Get a quote for bulk jobs, and we’ll review your images.
Frequently Asked Questions
How do I expand the background of an image in Adobe?
In Photoshop, press C for the Crop Tool and set Fill to Generative Expand. Drag the edges out and click Generate. No Photoshop? Use Generative Expand in Adobe Firefly on the web. Both fill the new space with matching AI content.
How to extend a background in Photoshop without AI?
First, add space with Canvas Size or the Crop Tool. Then fill it one of three ways:
- Content-Aware Fill copies nearby pixels.
- Content-Aware Scale stretches simple areas.
- The Clone Stamp Tool rebuilds textures by hand.
How to expand canvas in photoshop without generative fill?
Go to Image > Canvas Size (Alt+Ctrl+C) and add width or height. Or drag the Crop Tool outward with Fill set to Content-Aware Fill or Transparent. Neither option uses generative credits.
How can I adjust the background size in Photoshop?
That depends on your goal. Wondering how to make the background bigger in Photoshop? Enlarge the canvas, then fill the new space. Want to resize the whole photo instead? Use Image > Image Size.
How do I extend a part of an image in Photoshop?
Select the area with the Lasso Tool, including some background you want to continue. Then click Generative Fill in the Contextual Task Bar and generate. For a no-AI option, run Edit > Content-Aware Fill on the same selection.
How to stretch an image in Photoshop without distortion?
Use Edit > Content-Aware Scale. It stretches low-detail areas and keeps important ones in shape. To lock your subject, save it as a selection and pick it from the Protect menu. Keep stretches small for the best results.
How can I extend a photo to make it a wallpaper?
Set the Crop Tool to your screen’s aspect ratio, like 16:9 for most desktop monitors. For a phone, match your screen’s ratio. Then set Fill to Generative Expand and click Generate.
How to expand background generative fill in photoshop?
Generative Fill works inside a selection, so it can’t add canvas on its own. Use Generative Expand in the Crop Tool instead. Or enlarge the canvas first, select the empty area, and run Generative Fill.
Can I extend a background in Photoshop for free?
Content-Aware Fill and Content-Aware Scale cost nothing beyond your Photoshop plan. Generative Expand uses one generative credit per generation. Adobe Firefly offers free daily generations, and Photoshop has a 7-day free trial.
What does Ctrl+J do in Photoshop?
Ctrl+J (Cmd+J on Mac) duplicates the selected layer. With an active selection, it copies just that area to a new layer. It’s the fastest way to protect your original before editing.
Summary
You now know how to extend the background in Photoshop five different ways. For most photos, Generative Expand gives you the fastest, most realistic result.
Can’t use AI, or working with a plain backdrop? Content-Aware Fill, Content-Aware Scale and a simple strip stretch still do beautiful work.
Whichever method you pick, finish like a pro. Match the grain, follow the lines, and check the seam at 100% before you export.

Shahidul Islam
Founder & Managing Director at Clipping Photo Experts
Helping photographers, brands, and ecommerce businesses create stunning visuals through professional photo editing, image masking, retouching, and post-production services. Passionate about sharing practical Photoshop and photography insights based on real-world experience.