So, you want to create clipping mask in Photoshop, right? Well, this is a straightforward process. But sadly, many of us are unaware of the process imagining it a rocket science. Here goes the pretty simple and fast approach on how to make it.
First, open two images for using. The bottom layer will serve as the base image, and the top layer will be the one clipped to the base. Now, ensure that the layer you want to use as the mask is on top of the base layer in the Layers panel.
Right-click on the top layer in the Layers panel and select “Create Clipping Mask” from the context menu. Finally, you can now move, scale, or adjust the top layer as desired. The base layer will act as a mask image, revealing only the areas where the top layer overlaps it.
Moreover, you can use tools like the Move Tool (V), Transform (Ctrl + T or Cmd + T), or Layer Opacity to further refine the appearance of your clipping mask.
What is clipping mask photoshop?
A Photoshop clipping mask is a powerful tool used to control the visibility of one layer based on the content of another. Clipping masks offer flexibility and non-destructive editing, making them essential in design workflows.
It also allows you to limit the visibility of the top layer to the shape of the bottom layer beneath it.
In actual fact, the top layer clips to the shape of the bottom layer, adopting its transparency and visibility. This technique is normally used in graphic design, digital art, and photo editing to create complex structures, apply textures or patterns within specific shapes, and control the visibility of elements accurately.
Case Study: High-Quality Hair Masking Service
Which types of masking technique in adobe photoshop?
In Adobe Photoshop, there are several types of masking techniques, each suited to different purposes and scenarios. Here are some of the most commonly used masking techniques.
- Pixel Mask:- In Photoshop, a pixel mask usually refers to a method of masking in which the transparency of pixels in a layer is determined by their grayscale values in a separate mask layer.
2. Photoshop vector mask:- A vector mask photoshop is a tool used in Adobe Photoshop to control the visibility of a layer through the use of vector shapes. Vector masks are resolution-independent and can be resized without losing quality because they are based on mathematical equations rather than pixel-based data.
3. Photoshop quick mask:- A quick mask is a temporary way to create and edit selections using a special mode called quick mask mode. It allows users to paint a selection using brushes or other painting tools, which appears as a red overlay on the image.
4. Clipping mask photoshop:- A clipping mask is a method used to control the visibility of one layer based on the content of another layer beneath it. When you create a clipping mask, the content of the top layer clips to the shape of the layer below it.
5. Clipping paths photoshop:- A clipping path in Photoshop is a closed vector path or shape used to cut out a 2D image or photograph, while removing the background. It is particularly useful when you need to isolate an object or subject from its background for various purposes.
Further Reading: A Step by step Guide on Photoshop Masking Service
How to make a clipping mask in photoshop?
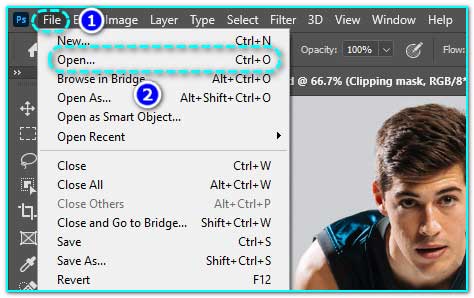
Step -: 1 Open Adobe Photoshop and open the image you want to edit.
Begin by launching Adobe Photoshop and opening the image you want to work with. Ensure you have the layers panel visible.

Step -: 2 Choose the pen tool from the primary toolbar.
In the lower half of the Photoshop toolbar, you can find the pen tool and choose it from there. (Shortcut: P)

Step -: 3 Create new path layer adobe photoshop.
To create clipping mask in Photoshop, you need to make a new path layer that involves using the Pen Tool to draw a path, which can then be converted into a vector mask for clipping.

Step -: 4 Create hand drawn clipping path around your images
Creating a hand drawn clipping path around images in Photoshop also involves using the Pen Tool to trace around the object’s edges manually.

Step -: 5 Select the clipping path of the model images
Now, to select a clipping path, you will need to use the pen tool to outline the model’s silhouette. Create anchor points along the edges, closing the path when done. Right-click the path in the Paths panel and select “Make Selection.” Refine if needed, then apply adjustments or masks accordingly.

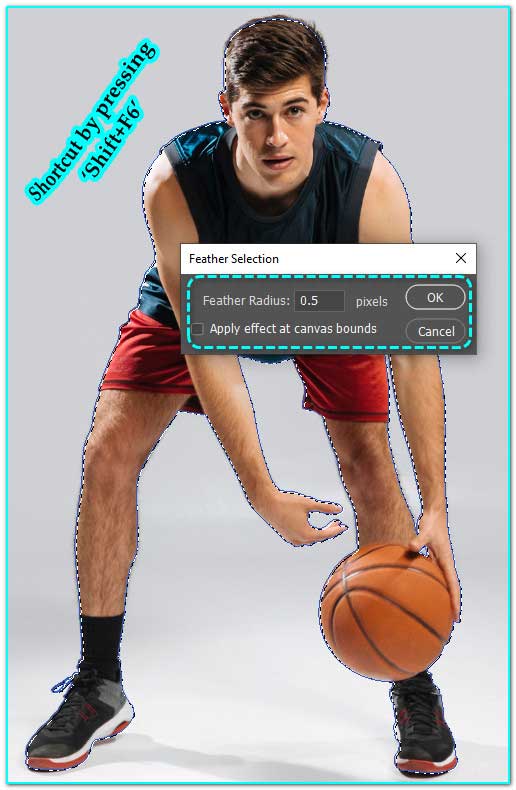
Step 6:- For better smoothness use 0.5 feather from the feather option
Feathering refers to softening the edges of a selection or masks in photoshop to blend them more seamlessly with the surrounding area.

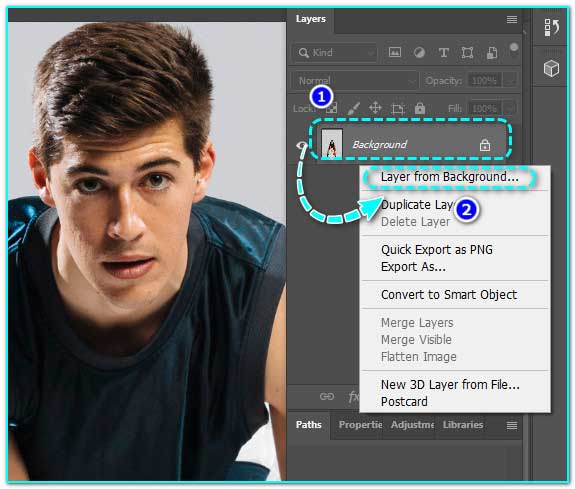
Step 7:- Choose “Layer From Background” and then click OK.
To perform this action:
Double-click on the background layer in the Layers panel. In the dialog box that appears, then click OK. This converts the background layer into a regular layer.

Step 8:- Apply a layer mask, as demonstrated in the image provided.
You can apply a layer mask to your chosen layer in Photoshop, allowing you to control the visibility of different parts of the layer without permanently deleting any image data.
Further Reading: How to add a layer mask in photoshop?

Step 9:- You can now activate or deactivate the layer mask.
Once you have applied a layer mask to a layer, you have the ability to clip its visibility, effectively activating or deactivating it. Activating the layer mask means it is affecting the visibility of the layer it is applied to, while deactivating restores the layer to its original visibility. This toggle functionality allows for quick adjustments and experimentation with layer masks in photoshop to achieve the desired effects in your compositions.

Last words
Undoubtedly, photoshop clipping mask are invaluable tools for non-destructive editing, enabling precise control over layer visibility and composition. Their flexibility empowers users to create intricate designs, composite images seamlessly, and experiment with various visual elements with ease.
From blending images, adding intricate details, to crafting complex compositions, clipping masks offer a versatile solution, enhancing creativity and efficiency in digital artistry within the Photoshop environment.
So, it was all for today. To enrich the topic, you can leave your thoughts in the comment section. We appreciate your contribution.
Recommended Reading: Difference between clipping mask and layer mask


Recent Comments