Welcome to the beginner definitive step-by-step guide on how to change color in a photoshop tutorial. Today in this photoshop tutorial I will be guiding you through some of the most popular methods for photoshop color replacement.
Want to know the best thing about this article? It is a one-stop solution for almost all the popular image color changer problems in photoshop. so, if you are a beginner then this article is a must-read one. For this tutorial, i am using the latest adobe photoshop cc 2021 and i would suggest you all do the same. The latest version of photoshop software added a lot of exciting features and fixes bugs from the previous one.
What is a color change in photoshop?
Color change in photoshop is when you use photoshop software to change the colors from image using the color replacement tool. Why do you need to change colors from image?
Weel, a well balanced colorful image attracts more eyes and spreads more positivity than a dull one. Who doesn’t want the top notch look for their image?Everyone does and that’s why we need to change the color of our image in photoshop.
To make the color pop in the image, color correction is necessary but finding the proven method that is both easy to learn and do without any professional help is tough.


How to change background color in photoshop
We will start by knowing how to change background color in photoshop. Changing color background using photoshop has many methods itself and in this segment we will learn the method that the pro editors prefer the most. It helps you to get the most accurate background color changing experience.
We will use the photoshop pen tool for this segment so without further delay let’s get started…
Step 1: Open your amazon or online store product photography images
Product photos for online stores are the primary images that mostly require background color changing in photoshop.
Because all the ecommerce platforms have strict product image requirements where a solid white background gets the number one priority.
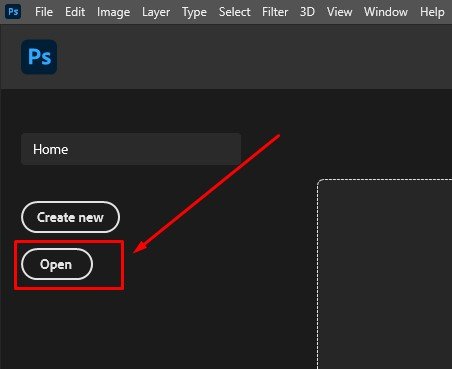
So we will change the background color of a product image here. First thing first, open your amazon or online store product photography image in the photoshop dashboard.
To do that drag the image and drop it on the dashboard for the shortcut.Or if you want to do it manually then click on the File→ Open New File from the Menu bar at the top and select the image you want to insert then click OK.
Step 2: Create a duplicate layer
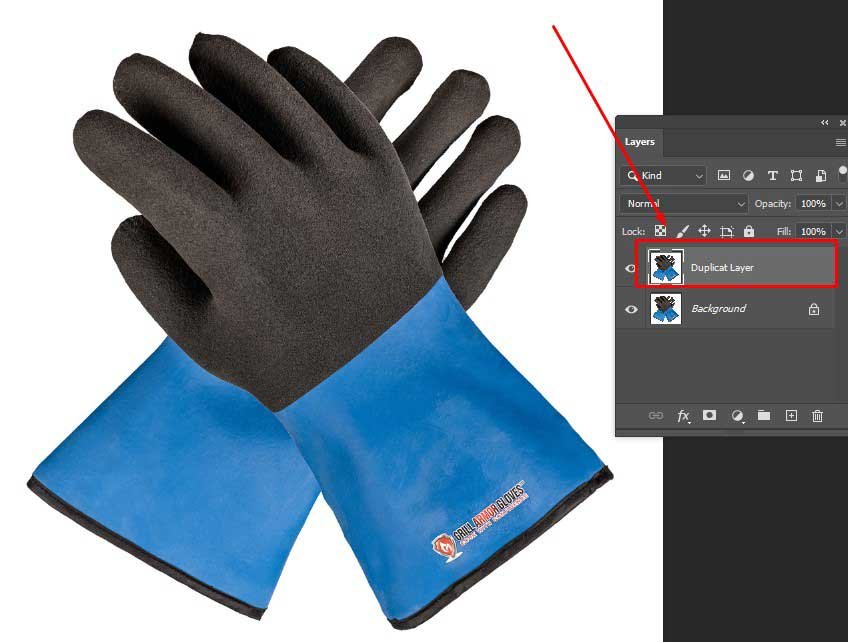
Now it’s time to create a duplicate layer of the original image layer. For the photoshop beginner it’s a mandatory step and if you are one of them then don’t skip this ever.
I would suggest to all the photoshop learners to do this step and make it a habit for them. After we insert an image in the photoshop if we start our editing right away then its possible that we are editing our original file.
And if anything goes wrong or after changing a couple of things if we feel our editing is not appropriate then it’s difficult to go back to the original file state. To avoid this state and also to avoid destroying our original file we must create a duplicate layer of it and edit on that. To create a duplicate layer of the original layer choose Layer > Duplicate Layer from the layer panel then name it whatever you want and your duplicate layer is ready to go.
Step 3: Select Product Using Pen Tool In Photoshop
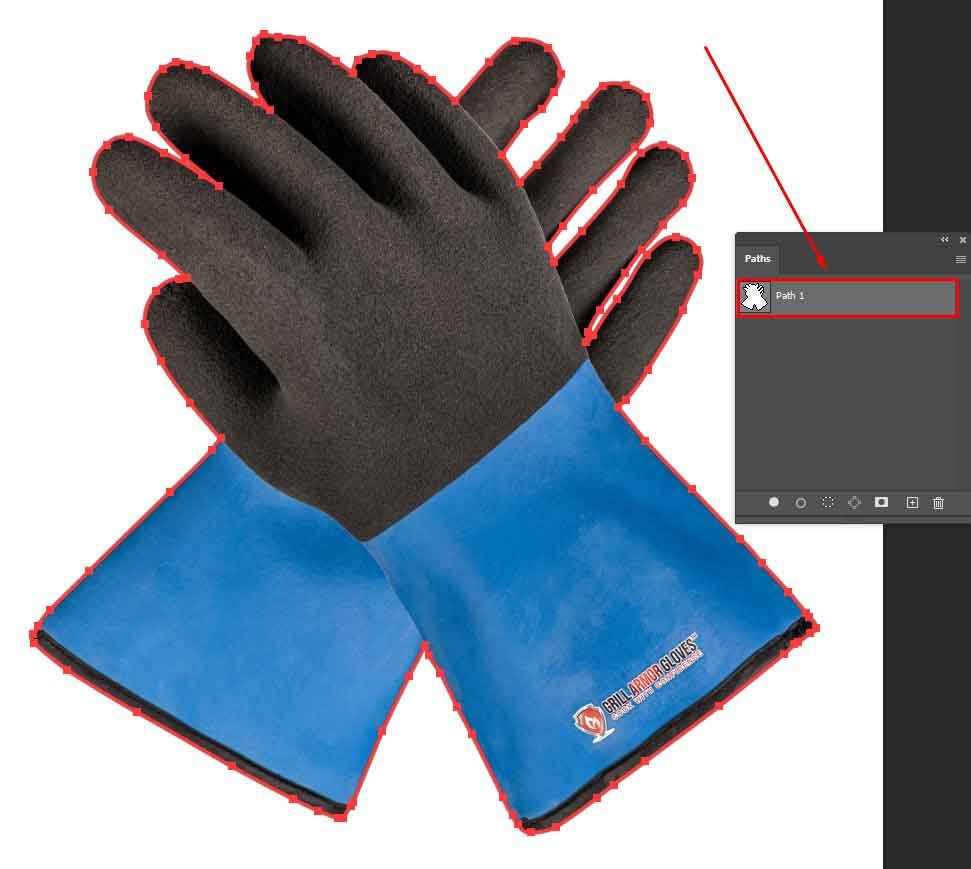
To change the background color of our image we now have to select the background. To make the selection accurate we will use the photoshop pen tool. Select the duplicate layer before you start making any changes. Select the pen tool from the left toolbar and start creating paths around the edges of the subject. After we finished creating the paths the subject will get selected but as we need to select the background we will now invert our selection.
To invert the selection go to Image→ Adjustment→ Invert from the Menu bar at the top and our background will get selected. You can also press and hold the Ctrl key and then click on the I button to invert the selection quickly.
Step 4: Go To The Images Menu And Click Adjustment Layer
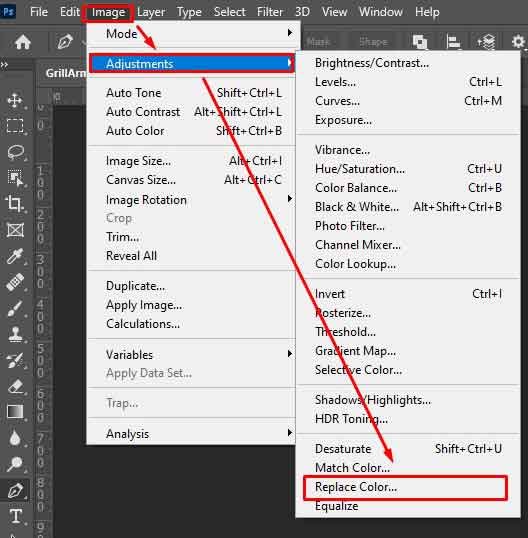
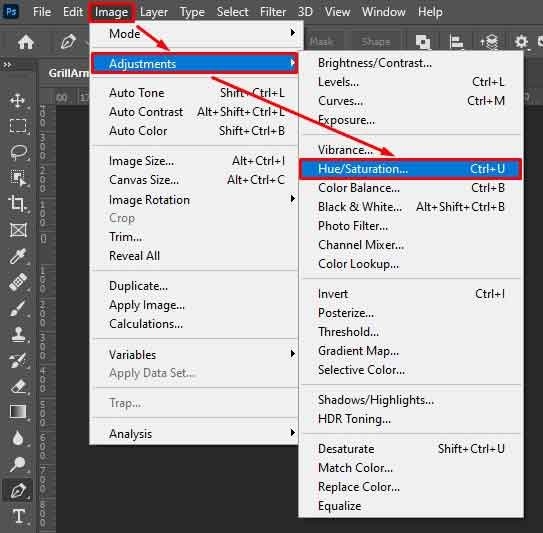
Now to color our background we need to go go to the Image menu and then click Adjustment Layer. From there we will select the Replace Color option.
This is not the only way to change the background color but it is the best professional way of doing it. After we click the replace color option a window will pop up from where we will be able to select the color we want to give to our background.
Choose the color, click OK and the background color will get changed right away. As we are editing product photos for online stores we must use solid color in the background.
A solid white color would be the best as most of the ecommerce platforms.
If your image color background is already white then you might think that you don’t need to change the background color but it’s not right. No matter how white background you use during the shooting, the professional camera and because of the imbalance lighting the end result wont be so great.
So for an already white background you can remove the background from the image and then create a blank white layer and place it at the back of your image.
Step 5: For Better Result Change Saturation And Lightness
At this stage we do get the background color we wanted but we can refine it and make it more attractive, believable and accurate using Hue and Saturation settings in photoshop.
Go to the adjustment layer from the layer panel and select the hue and saturation option to get the access to the saturation and lightness. A hue and saturation window will pop us and from there play with saturation and lightness slider until you get a better result for your image.
We know practise makes a man perfect so if you don’t get right settings at the first, second and even in the third attempt i will suggest you to practise more.
Hopefully you have successfully changed your image background color by following the steps above.

Changing The Cloths Color Of A Photo Using Clipping Path Tools
In this segment of our photoshop tutorial we will be changing the cloth color of a photo using clipping path tools. Yes, you can change your image apparel color using the pen tool. And it will be the most precise of all the methods that photoshop has to change the clothing color. If your apparel color in the photo doesn’t come out just as you though then you can use clothing color correction in photoshop. Sometimes online clothing business retailers change their clothing color to create different variants of the same product. It helps them to avoid repetitive photoshop shooting for the same product because of the different color. By changing the clothing color using photoshop will reduce the cost and also some extra hassle. So without wasting any time, let’s go and learn how to change the cloth color of a photo in photoshop.
Step 1: Open Your Clothes Image In Photoshop
Use the latest version of photoshop if you want to get the top notch image editing for your photos. In the first step we will open the image we want to edit in photoshop.
You can insert your clothes image in photoshop by dragging the image and dropping it on the dashboard right away.Or you can go and click on the File option from the Menu bar at the top. From there when you click on the Open New File, a window will pop up. Navigate the file, select it and click Open to insert your image in the photoshop dashboard. Your image will be inserted into the software and an original layer will be created in the layer panel.

Step 2: Create A Duplicate Layer
To keep intact our original layer now we will create a duplicate layer of our image. It’s important to create a duplicate layer before starting doing changes to the file.
I have already discussed why we must do this step. If you somehow missed that part i will suggest you to go and read the previous tutorial.
To create the duplicate layer we have to go and select Layer > Duplicate Layer or select the original layer and click on D by pressing the Ctrl button in the keyboard.
You can name the duplicate layer according to your preference and I would suggest you to give a name that matches what you want to do with the layer.
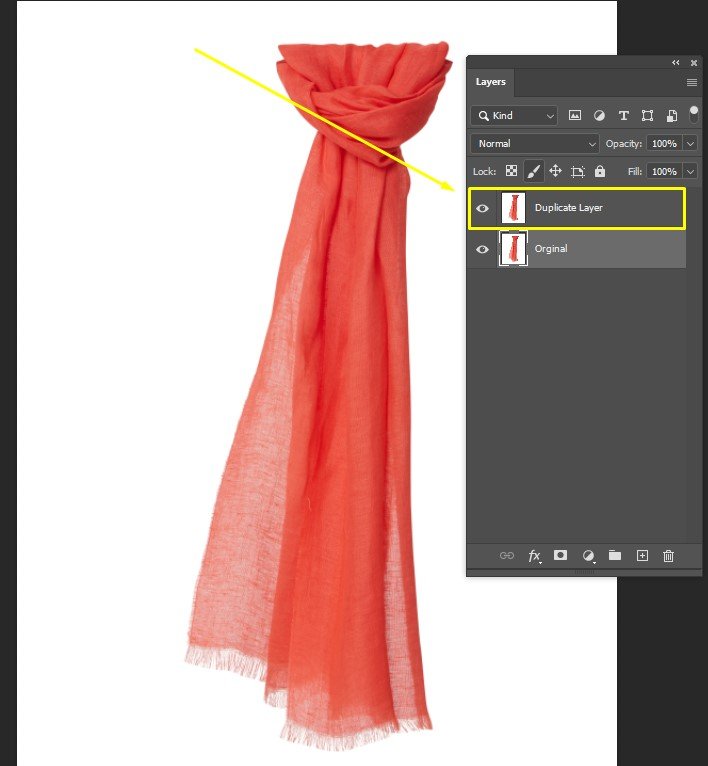
Step 3: Select the photoshop pen tool and create clipping path
Now as we will be changing the cloth color of our photo using the clipping path technique we need to use the pen tool for this purpose. So select the photoshop pen tool from the toolbar at the left side of your dashboard. The pen tool will not only help us to create paths but also help us to select the portion of the image that we want to change the color. The photoshop pen tool is a professional image editing tool that will require a lot of practice to master and get the precise selection.
You will find many ways to select your subject in photoshop and they are easy to use also. But with the pen tool, you will get full control over your selection which is a great thing while editing. So after we select the photoshop pen tool, we will create paths around the edges of the apparel product we want to change the color. You can start creating paths by creating and joining the anchor points one by one. Practise and try a couple of times to get the perfection.
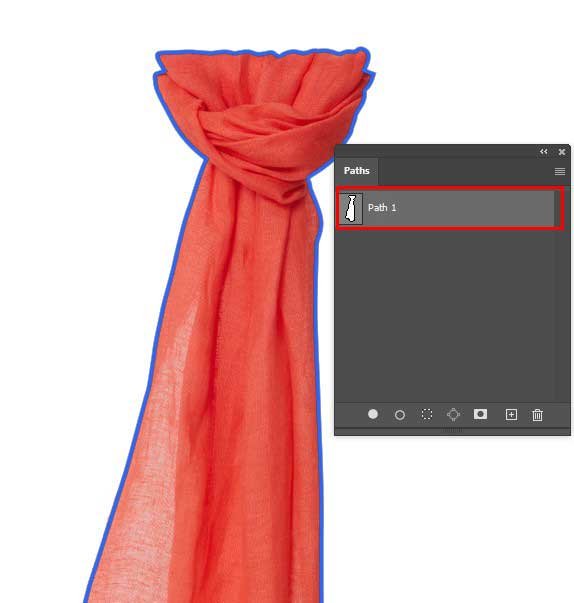
Step 4: Select clipping path layer and separate the images
After completing creating the paths around the subject now we will separate our selection. Ensure that we are working on the duplicate layer and click on the clipping path layer. Then press Enter by holding the Ctrl button on the keyboard and the portion we have created paths around will get selected and act as a separate individual in the image. So now whatever changes we will do will only affect the selected part of the image.
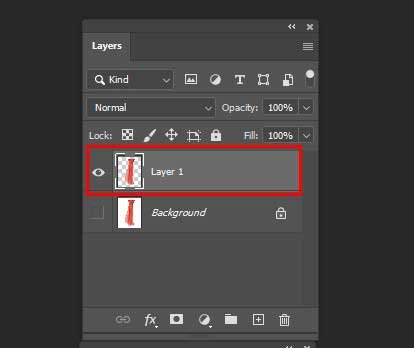
Step 5: go to the images menu and click adjustment layer
The part of selecting the clothes of the image to change the color is over and now in this part we will work on the actual color change process.
But this doesn’t mean you can skip the previous step because without a precise selection you will mess up the image for sure. First we will go to the images menu and click the adjustment layer. You will find the Image option on the Menu bar at the top. When you click on the option a sub menu will appear from where you will select the adjustment later option.
This option is the easiest way of changing colors from image which is why i am doing this and i will suggest my readers to do also.
Step 6: Click Replace Color
After clicking on the Adjustment Layer option another sub menu will appear from where we will select the option called Replace Color.
As the name suggests, this option will allow us to change our clothing color. After clicking on the replace color option a window will pop us and there we will find the color to select and confirm for our clothing product.

Step 7: Choose The Color Click
From the replace color window choose the color you want to give to your clothing product and then click Ok to confirm the color.
As we are coloring apparel type products we have to keep in mind what color suits best for apparel products. So choose color wisely and play with the settings to get the perfect match.
I always encourage my readers to try and play with the settings so that you can learn new things everytime. If any of the new tools comes up you must play with it to get a better learning about that.
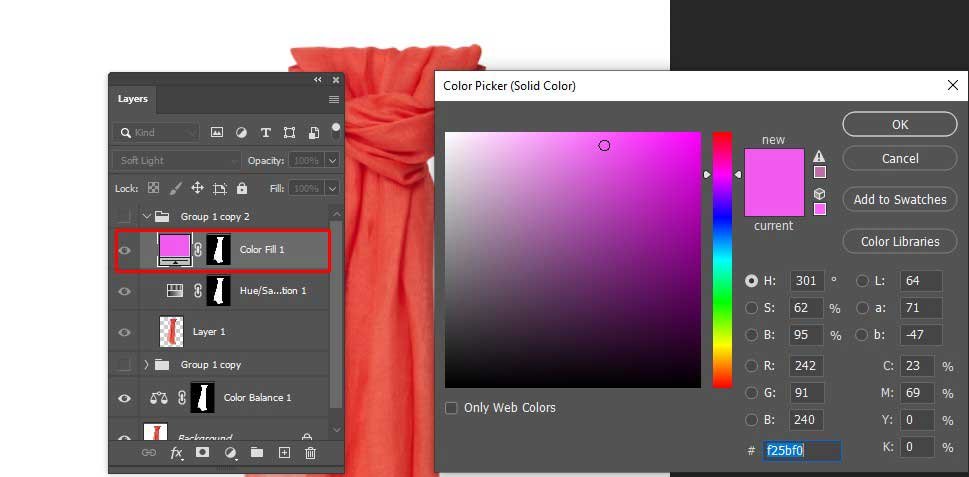
Step 8: For Better Result Change Saturation And Lightness
You can go for the hue and saturation settings to make your changes more realistic
especially when you play with the image colors. Get the Hue/saturation settings from the adjustment layer. You will get a pop up window after selecting the option and there you will find the saturation and lightness slider. Play with these two sliders until you get the exact end result you always wanted and when you get the color balance you were looking for, click on the Ok button to confirm.

Step 9: Then Select The Brush Tool From The Tool Panel
To make the color more precise, zoom in to the edges. And look for issues such as some portions are not selected or colored correctly. If you find such areas select the brush tool from the tool panel. The brush tool helps to fix these small issues without any hassle. After selecting the Brush Tool, select the foreground color as black.
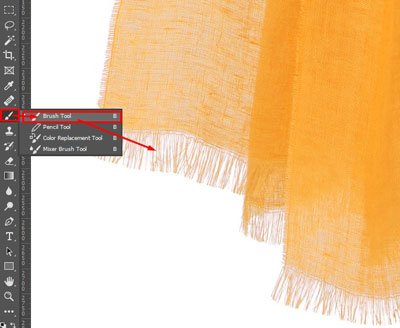
Then move the brush on the outline of the clothes and paint on them. This will help you to fix those edges without repeating any of the steps above which is a huge time saving process. If you have followed my every step then now you will get your clothes color of your photo is changed.

How To Change Eye Color In Photoshop
In this photoshop tutorial segment we will learn how to change eye color in photoshop. I know it is one of those photo editing processes that most of us wanted to learn so that we can change the eye color of our images but very few could pull it off perfectly. Most of the tutorials that we found about changing eye color on the internet are clumsy and tough to follow. So below i have tried to break the process down and make it simple for you guys. So let’s get started with full confidence and hope that you can learn from it and like it.
Step 1: Open Your Model Eye Photography Image
We will start with the basic things first which is open your model eye photography image in photoshop dashboard and prepare it for the edit. Inserting a photo is simple and smooth as butter. You can drag and drop your file on the adobe photoshop dashboard to insert your image. You can use the long manual route to open your image in photoshop but i would suggest you to go for the drag and drop option.
You can find the manual option from the previous segment of the tutorial so if you wish to do that go and check out the previous tutorials step 1.

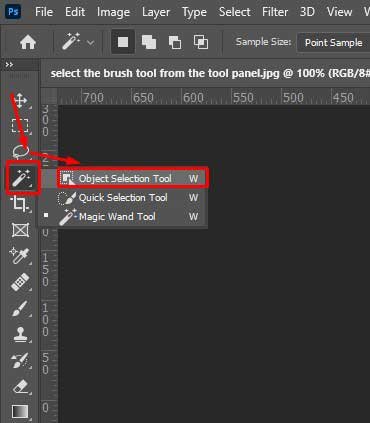
Step 2: Select Object Selection Tool From Tool Panel
Now we will select the section of the eye we want to change the color of which is the iris. You can select your subject using many different tools in photoshop but in this segment we will use the object selection tool. But before as we are editing our models eye so we will zoom in to the eye and bring the subject at the center of the dashboard. It will help us to focus on the subject and see every detail clearly. After zooming in we will select the object selection tool from the tool panel at the left.
Making selection with the object selection tool in photoshop is easy. Select the tool and drag your cursor over the area you want to select by holding the right key. When you release the right button of the cursor after dragging it over the area it will get selected and you will see the selection line around it.
As we are working with small areas our selection won’t be perfect at the first try. If you zoom in a little you will see some parts of the subject get over selected and some parts are less.
Use the + and – sign right at the bottom of the menu bar to select and deselect the selection and make the selection perfect.
Step 3: After The Selection Create New File And Adjustment Layer
Now that we got our subject selected we will color it using the Hue/Saturation settings and to get the settings we will go to the adjustment layer option.
We will find the Adjustment Layer option at the bottom right side of the layer panel. If you click on the adjustment layer option a list of options will appear and from there you will select the Hue/Saturation option.
You can also find an Adjustment option along with the Hue/Saturation setting at the top under the Image option in the menu bar. If you wish to select that you can also do that.

Step 4: From That List, Select Hue/Saturation
From the list you get after clicking on the adjustment layer we will locate the Hue/Saturation settings and click on that. A Hue/Saturation window will pop up and from there we will play with the sliders and see the color changes on the subject. open hue saturation adjustment and control the color hue saturation option
We will try some combinations by changing the value of the sliders and set the color we want to use on our subject.

Step 5: Put A Checkmark On Colorizing In The Properties
In the hue and saturation window we will see an option with a tick box at the left of it called colorize. Pet a checkmark on colorizing on the properties to make the color we will select more accurate and precise. Pro Tip: you can skip this step but i won’t suggest or encourage you to do so if you want the best result.
Step 6: Then Select The Brush Tool From The Tool Panel
Just like the previous segment of our photoshop tutorial we will use the brush tool again to change the eye color. Go to the Tool panel from the left side and select the Brush Tool like before. Set your brush size according to your requirements and do not make it too small or too large. After selecting the brush tool, select the foreground color as black and then move the brush on the outline of the eye lens to give an accurate color to it. So, with the help of this easy and fast photo editing trick you can effortlessly change eye color in photoshop.
Outsource E-commerce Product Photo Editing
How To Fix Skin Tones/ Color In Photoshop
After changing our models eye color in this segment we will learn how to fix the skin tones/color in photoshop. Everyone loves to look amazing and stunning in photos. But because of unwanted scars or spots it becomes tough to get a nice and smooth finish to the skin. Imperfect skin tones might look awkward and you lack confidence to show them to the world. Almost all of us know that we can fix this but very few of us know how to fix skin tones in photoshop. You can get natural skin tone but gorgeous looking skin using photoshop.
So today we will learn this extremely easy and simple to do skin smoothing technique using color adjustment. Without doing any delay let’s get started…
Step 1: Open Your Model Photography Images
You can use the same model image that you used in the eye color change segment or if you will you can use a new one as well.
No matter what the process of inserting an image in photoshop remains the same. Drag and drop for the shortcut and menu bar for the manual editing lovers. Check out the above tutorials first step and you will get to know the process very easily.

Step 2: Select Object Selection Tool From Tool Panel
We will again use the object selection tool to select our subject. Go to the Toolbar At the left and select the object selection tool. If you wish you can use other selection tools as well. Drag your cursor while you keep pressing the left button around the area you want to select and your subject will be selected. Use the select and deselect option to make your selection more precise and accurate. Zoom in if you need to reach at the unclear edges of the images. Look carefully and complete the selection process to select the skin tone that you want to fix or something.

Step 3: Refining The Selection
Using the + and – sign to get perfection in the selection might not work in some cases. So to refine the selection and take it to another level of perfection we will use the Refine Edge option.
It’s a hidden gem of the latest versions of photoshop because in today’s photoshop software it is hidden. But you don’t have to worry about that because your host will do that for you. I will tell you the exact path where you will find it in photoshop. To find the option first go and click on the Select option from the menu bar at the top.
Then from the list that will come find the select and mask option. When you find it, hold the Shift key and click on it.
Your Refine Edge window will appear with all its settings. Use the sliders of smoothness, radius, feather, and contrast to refine the selection.
Step 4: Apply The Skin Tone Corrections
In this step we will do some color adjustments using Exposure, Brightness/contrast, and Hue/saturation tool in photoshop.
These tools are found in the adjustment layer so we will click on the adjustment layer from the layer panel at the bottom. A list will appear and from there find the above three settings and then play with them until you get your result.
You can create a professional natural like cool skin tone using those settings so try finding a combination that works for you. Control the brightness as much as you can because too much brightness will burn your image.
Step 5: For Better Correction Using Hue Saturation
You can also use hue and saturation settings any time you want and make your color more better looking and stunning. Click on the Adjustment Layer settings from the layer panel and select hue/saturations option.
From the window that will pop up change the values of hue, saturation and lightness sliders. It will change the colors of the image and see if it goes with your image or not.

Step 6: Touch up skin
No matter how expert you are in image editing, when you finish model skin retouching there will be the smallest detail that you might not notice. So in the last step we must double check every corner of the skin to make sure we edited correctly. To make the final skin touch up use the brush tool from the tool bar. Zoom in to the image and paint over the area that needs touch up. After completing the final touch up we will get a stunning model photo with smooth skin.
How to change background color in photoshop
We have already seen how to change background color in photoshop in this article. But in that part we have used the great photoshop pen tool for our selection. In this part we will use another method for our subject selection. So let’s begin.
Step 1: Choose Your Photography Images
I will speed up this method as we have already done these steps in the first method. First thing first, choose your photography image and insert it in the Photoshop dashboard.

Step 2: Create Two Layers
Create a duplicate layer from the original layer to intact the original file. You can create duplicate layers from the layer panel or use Ctrl+D shortcuts. Create two layers so that you can use later and practice over it.
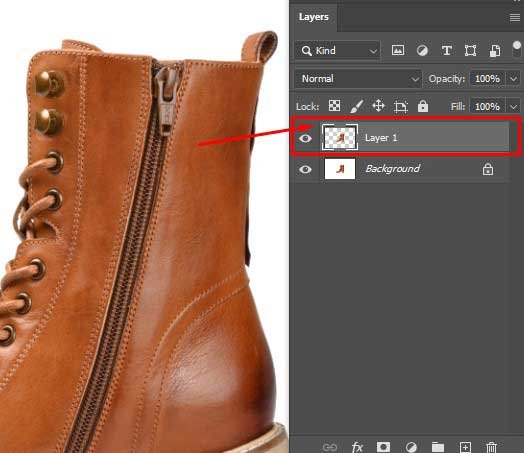
Step 3: Select The Subject
Now it’s time to select the subject to remove the background and change the background color. Earlier we used the pen tool but now we will use the Object Selection Tool from the toolbar. Using the object selection tool is easy and you don’t have to be any pro or expert at using this tool. Select the tool, hold your left cursor and drag it over the subject that you want to select and release. The subject will get selected but as it’s an automatic process if you zoom in a little you will notice the flaw. Use the select/deselect button at the top to clean up the edges and bring perfection in your selection. After we complete selecting the small areas then we will get our subject selected and ready for the next step.
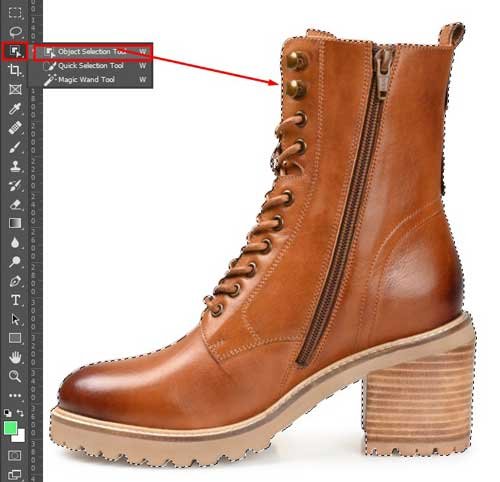
Step 4: Select and Isolate Your Subject
We have selected our subject and now we need to invert the selection and select the background. It’s because we will isolate the subject from its background. And then change it with a new color background. To invert the selection we can use the adjustment layer option from the layer panel or we can use the adjustment option from the menu bar. In both options you will find the invert option and click on that to invert the selection.
After inverting now we will have our background selected and we will hit the delete button on the keyboard. It will remove the background from the image.

Step 5: Make a Solid Fill for Your New Background
After deleting the background from the image now what we have is a transparent background. We will make a solid fill for our new background. To do that this time we will use the adjustment layer option from the layer panel. Go to the Adjustment Layers and select the solid color option. A window will appear and from the select the color you want and hit the OK button to make our background filled with the color we have selected. And we will get our background color changed with such easy steps in photoshop.
Pro Tip: i have used the latest version for Adobe Photoshop cc 2021 and i would suggest all to use the latest version if possible.

When Use Color Correction?
When we talk about correcting something this means the thing that needs correction has flaws. So the answer of when to use color correction is simple. When your image has imbalance colors you will need color correction service and how will you know that your image color is imbalance?
Well to know if your image color has any problem or not is simple. If your image looks dull and gloomy this means it has incorrect colors.
Other than that, when you need to change colors of the same product to cover all the versions of it then color correction is must. Color correction service can save your production cost and let you make as many variations as you want for one product.
Moreover when you shoot photos to attract viewers eyes then the perfect even in colors matters.
When Not Use Color Correction?
When your image has proper color and looks great, then you don’t need to use any color correction. Besides that
● When your product has no color variations
● When you don’t want to impress your audience
You won’t require color correction service.
Last Words
In this editorial I didn’t just share a photoshop tutorial on changing color in photoshop. I have shared an answer to a question that I was once searching madly.
But then i didn’t find any all in one photoshop tutorial on how to change color in photoshop. I don’t just want to write about how you can change color. But I want to offer most of the tutorials regarding changing color of photos in photoshop.
So i bring to you a simple and easy to do all in one color correction tutorial that will make you change color in photoshop like pro.



Recent Comments